


The center line punch, an elegant weapon for a more civilized age. The punch is the answer to all your questions, It is the mother motion of all hand techniques. Know the punch, and motions like the tan, wu, fok, etc all fall right in place. Learning to hold the fist in steadiness with the wrist as well as learning that the elbow leads the motion to the punch, and controlling the shoulder to sink, is the basic foundation in understanding all the three main joints that are involved in doing the punch. Unlike weapons like a gun, knife or mace, that you can lose and be used against you, once you develop the punch, it will always be there for you, a part of you, and trust it you can.
Front
close up
Side
Ver 1.0
3) Regular - I definitely want to make it clear that regular punches, does not mean doing the punches at 100% power. Regular speed means practicing punches sorta similar to driving your car at local streets, roughly 35mph.
4) Times 3 -
2) Slow and steady - After one has become proficient with the open hand drill, previously mentioned. It is now just a matter of simply closing the hand and making a fist, and doing exactly the same motion as one has practiced. It is a common tendency to want to create more tension from the beginning of the motion to the end. What the student should concentrate on when doing this drill, is to take it slow and steady and pay close attention if the tension in the fist does in fact change when throwing it out. In addition this drill, should be the focus for a good amount of time for the student, until he can drive the motion of the punch without that much thought placed into it. If he is at the point where he or she still has to think if the fist is in the center, or shoulder is rising, or creating more tension then necessary, then continue to practice this until thought is close to gone. While the goal of the first drill is to help you concentrate on just the elbow movement, slow and steady makes you focus on the entire punch motion.
-
-How do I get the power?
-
-
-
-Why do I focus on only the index finger and thumb on?
-
-Do I squeeze my fist at the point, when I hit my target?
-
-
- What’s the most common mistake with the punch?
-
-How much rotation is there in the punch?
-
-What are three joints involved in the arm and their function?
- Is being square that important?
General Description
How to make a fist

pt2
Attention to detail Lvl 1
Back in the days (exeperience )

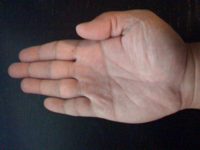
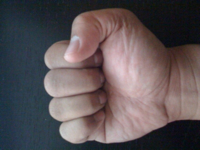
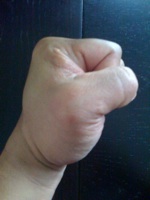
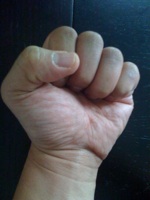
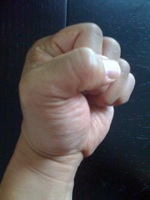
Step 1 - Before we even begin to throw out the punch, one must first learn the correct way to make a fist. Open the hand so that all the fingers are naturally pointed with natural tension. Notice in the picture that the fingers are aligned along with the wrist, so that there is no kink at all. Now roll the fingers in, just so that there exist no gap in the fist. Also notice that the finger nails or the tip of the fingers are in line vertically. If you squeeze too much with the fist, you end up like the picture in the middle. The best way for me to describe it, is roll the fingers with the thought that there’s a grape in your hand, close it just enough so that you do not end up squeezing the grape. The thumb should only cover 1 finger that being the index.
Step 1 - Start with single side only, pick the less dominant hand (i.e. the hand that you did not give a name too) and keep it at the side of you fully relaxed. What you'll want to pay attention to is that the shoulder is relaxed and sunk as well as the elbow by your side. Now make a fist with the proper tension, concentrating on the index finger as well as the thumb when you make the squeeze. Afterwards, naturally bring the fist upwards to your center roughly to the sternum area. The fist will be about 6 to 7 inches away from your chest. If you do this correctly, you'll notice the elbow only made a slight adjustment from the original position from the side, and your shoulder is basically at the same spot as well. If your shoulder rose during this process, relax it again to correct the error. Also, the fist alignment is very important, if you look at the pictures, it should be held at 3/4's perspective, since there will be a natural drilling motion for the punch. If you hold the fist palm up, like one of the pictures, you'll have unnecessary tension prior to the punch. If you hold the fist perfectly vertical, like the other picture, you will not have any drill motion. Thus, the 3/4 alignment is what you should see if you look downwards at your first.
Teachers Notes
Teachers Notes


Teachers Notes
Probably the hardest obstacle that you will face when teaching the punch, is overcoming the concept of no muscle in order to generate the power. I’m not sure why over time we believe this, since when we first start of as little kids, our natural tendency is to relax. Maybe society is to blame for too much Power Rangers, TMNT, or Bruce Lee. Regardless of the fact, you must help the student unlearn what he or she has learned, and rediscover what relax really means. Younger students are quicker to adapt, to this concept while older students will have a more difficult time. The same goes true for students with no experience at all in martial arts as opposed to those who have trained in Wing Chun or something else. The best suggestion is to go the slow and steady route. Its harder to use muscle when you force the student to take his time and drive the motion at a snail’s pace. As a teacher you need to make sure from the beginning of the punch to the very end, the student learns to hold the punch with just the right balance of tension.
Side pt1


When your a beginning teacher, the best advice Sifu said, was to always teach the truth. So, there maybe be times where you come upon a question which you may not be able to answer. Sometimes, you can get the answer by either feeling the answer through doing the motion. However, if that fails, then do not be afraid to say that you don’t know .
Exercise

cp
n/a
to
Teachers Notes

The reality of things is that anytime the student is standing he or she is practicing the stance whether they are aware of it or not. As a teacher, your job is to help them get to door, and the rest is up to them. Often times, you will need to repeat yourself like a broken record to fix your stance, stay 50/50, keep shoulder width apart like a parent talking to a teenage kid. But, sometimes words are not necessarily the best remedy for understanding the wrong. Try getting into a habit of allowing the student to feel their errors, and reach that level of “awareness.” Only then, can they take one level and move to the next. You must remember you as the teacher can never do it for them, but simply aide them in the process. And as a final note, that path to reach one student may not necessarily be the same path for the other student to understand the process. Every student is different, and a good teacher may even have to create a new process in order to help the student learn the lesson. Once you can do that and mold drills at your command, you truly have then grown.
The best tip I can give regarding the 4 steps to open YGKYM, is feed the student just enough so that they can eat. Thus, only if they ask for more then give it to them. Allot of times, depending on your level of teaching, you may have tons and tons of information to share with the student. But over feeding can also lead to more confusion. As an example, in step 1 simply state what they have to do to complete the task. If they then ask, what is the purpose of it, then answer. I’ve always gone by the following of Sifu, that students ask the right questions when they are ready for more to digest.
Total # of exercises = 5 The exercise is also place in order of importance.
Each exercise also gives a suggested duration of time to practice it as well as the frequency in a week.

5) 100 or bust -
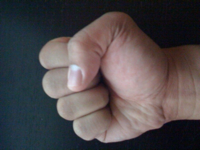
Incorrect
Starting hand position to make fist
Correct
Fist
Step 3 - After the elbow has done its job and fully pushed out the punch, you will feel a natural stretch to the entire arm. The keyword is natural because over tension can also lead to muscle tension as well. What you want to do at this stage, is not retract the punch so quickly, but do do a self check on several things after the punch has been done. Check first the fist and see, if you've squeezed the imaginary grape at the end of the punch as opposed to how your fist felt like at the beginning of the punch. You'll also want to make sure you that you've fully extended the arm as well. In addition, more then likely like all beginners of the punch, your shoulder will have naturally rose. Just be aware and make the adjustments after wards, because it will rise in the beginning since you do not yet know how to fully control the muscles involved in doing the punch. Finally, check the fist alignment, it should have rotated just a pinch, depending on the side, if you started from the left hand, from 10 to 11 o'clock and for the right hand from 2 to 1 o'clock.
Step 2 - As long as you feel that the fist is at your center with proper tension, and both the elbow, shoulder are naturally sunk, concentrate on extending the arm by focusing solely on the elbow. Its best to keep things to a single thought at this stage, and to remember, that elbow leads the motion for the punch. What you want to pay attention to is whether or not the fist is gradually escalating upwards to its proper position, or if it is elevating immediately once you decide to move the punch. You definitely want to make sure that its escalating and not elevating. This is definitely the most common mistake, when you start to punch, in that the beginning motion is up, instead of going forward.
Fist
Fist
Fist
Step 1- Punching with 2 hands, really is no different from single punch hand development. But there are some key things to do, in order to get the process correct. You should first take one hand and shot it out like a regular punch (see directions of single punch development above). The next step is to take the 2nd, hand and position it exactly the same place as you would do a single punch. Notice, that what you will have is 2 hands that is in the before and after stages of the punch, which is no different from what you have practice before but only with 2 hands. The key thing to pay attention to is to make sure both hands are on the center line, all to often, one or the other is not in line. So imagine that both fist are constantly on a tight rope.
How to single hand punch
How to double hand punch
Step 2- Once the hands are in position as stated from above, the rear hand will continue to do the same motion as previously mentioned in the single punch development. However, the motion that one has to pay attention to is the lead hand, and how it retracts back to go back into position and to make sure it stays clear of the path of the punch. One must remember that the elbow leads the motion in two different ways, the punch hand has the elbow leading the motion with a push, while the front hand has the elbow leading the motion with a pull. The retracting hands motion differs from the elbow and will naturally drop back to the side, having the fist drop and circle back to the ready position, instead of de-escalating downwards.
Incorrect
Incorrect
Correct
What you want to stress to the student, is perfection of motion. Students will always desire knowing the power of the punch, so help them get to through that journey, by explaining how physical development happens in Wing Chun. All physical development follows this same learning process. Motion leads to power leads to timing leads to structure. Being a perfectionist in mastering the motion of the wing chun punch will develop, unlimited power if one falls in love with going that path. In the video for teachers note, you’ll see me holding my palm for them to have a target to hit. Properly holding your palm for them to hit, allows them to feel the proper way to release power. Notice each time they hit my palm, I alter the angle of it at the moment of contact, so not only does the entire fist get to touch my palm, but at the end, I allow the bottom knuckles the opportunity to release fully.
pt2
1) Open hand - This is how every student should first learn the wing chun punch, without doing the punch, and just concentrating on the elbow motion. By doing it open hand first you learn to hold the hand with just the right balance of tension and relaxation. The thought is simply to extend the hand forward like your point to your target, with no emphasis on speed or power, but concentration on the motion. If done correctly you’ll see that the hand naturally rotates just enough when extending the hand forward.
Stories
The best tip I can give regarding the 4 steps to open YGKYM, is feed the student just enough so that they can eat. Thus, only if they ask for more then give it to them. Allot of times, depending on your level of teaching, you may have tons and tons of information to share with the student. But over feeding can also lead to more confusion. As an example, in step 1 simply state what they have to do to complete the task. If they then ask, what is the purpose of it, then answer. I’ve always gone by the following of Sifu, that students ask the right questions when they are ready for more to digest.

Stories
cp
Windy City Wing Chun Gung Fu Federation, Inc © 2009